
We had to get a little creative with the lighting in the shower for two reasons. First, the addition of the skylight limited the amount of space available for regular recessed cans. Between the sloped roof and framing interference, I couldn’t settle on a lighting plan that I was pleased with. Second, the accent lighting in the niche required something small, water-resistant and either low- or no-voltage. I decided that I could best achieve both requirements with one solution — fiber-optic lighting.
When I think of fiber optic, my first thought is one of those lamps they used to sell at Spencer gifts when I was a kid. (Side note, I used to love Spencer gifts, and they still are in business…where else are you going to get “Fart In A Can” or “Fundies”?)
Oh. Of Course.
But, this is what I was referring to.

Remember these?
The system I used is the same idea on a different scale. A single source provides light to multiple leads, but instead of hundreds of ultra-thin fibers, I used 6mm solid FO cable to carry light to seven 1-1/2-inch recessed downlights. I started researching online and came across Weidamark Lighting, where I was able to find what I wanted and get all my questions answered. And while the system was not inexpensive, it goes a long way toward helping create that retreat we wanted in the master bath.
The Install
The process began before the drywall went in. I needed a power source that was near the shower, but in a dry location. In our case, the shower backs up to the master closet, so I was able to simply add a receptacle high up on the closet wall. That kept my cable runs short and the LED illuminator out of the way, while remaining accessible.
With typical recessed lighting, the can housing is located and installed before the drywall, but in my case, I just needed to get the cables near the final locations, as everything would get positioned permanently during the drywall and tile install. This meant I could run the cable long, then cut and fit it during the final install.

Though not needed, a low-voltage receptacle box kept the cables organized.
I ordered these lights because they offered a clean, unobtrusive look. And when I selected them, I figured that the install would be easy. Attach the cable, fold the spring and pop it into the holes drilled through the drywall.
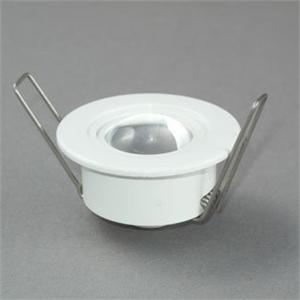
Unfortunately, things didn’t go quite that smoothly. I found the springs to be way too strong for the application. And when I tried to depress the spring to slide it through the hole in the drywall, it broke off the tabs in the plastic designed to hold it.

The broken housing.


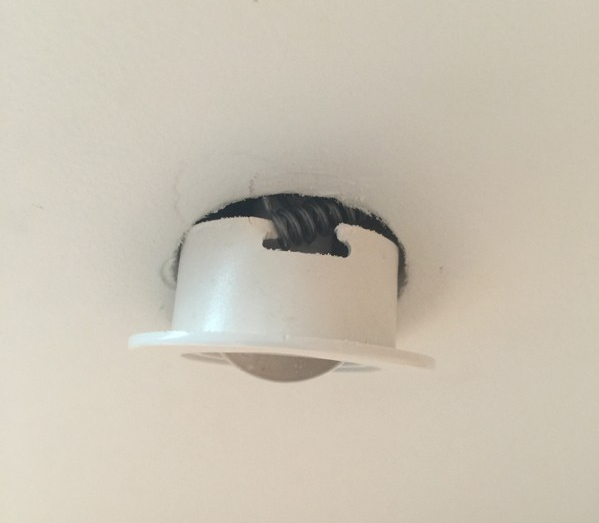
You can see the tiny crack on the left tab if you look closely.
After breaking several housings, I started being a lot more deliberate in how I loaded the spring and was luckily able to get the four lights mounted into the shower ceiling.

Niche Mods
The lights in the niche required a modified approach because the framing, niche structure and tile were a lot deeper than the housing. Since I had several broken housings , I used them to experiment with an alternate retaining system. And because I had not yet installed the cement board inside the shower area, I still had access to the framing.
First, I found a spring at the hardware store that was the correct length to reach through all the layers of the assembly. I needed one that would provide enough tension at about 2-1/4 inches of pull. Next I made a plate out of aluminum that held the spring and allowed for the cable to pass through. My thought was to mount the aluminum plate on top of the 2×4 then stretch the springs to connect to the housing.

My initial idea starting to take shape.

A small hole drilled into the opposing sides of the housing allowed the spring to connect on two sides.

The final assembly would have worked like this.
After spending some time working on this idea, I realized I could connect the springs directly to the wood framing with a small screw on each side, and save the time and hassle of making the aluminum mounting plates. So this ended up being a waste of time. Fortunately, I only made one bracket to test my theory.
Final Touches
The last thing to do was trim out the receptacle and connect the cables to the illuminator in the closet. I have been using Lutron Claro screwless cover plates throughout the house, but they require a receptacle or switch to mount, and since all I had here was a low-voltage wall box, I had to create an “empty” switch in order to attach the cover plate.
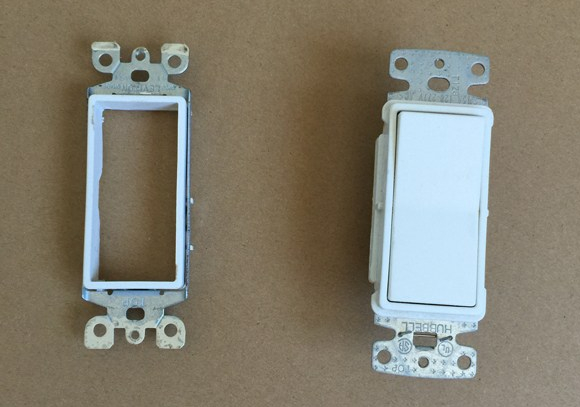
I removed the guts of the switch and left the white trim ring, providing the mounting holes for the cover plate.

Last, I bundled the cables and attached them to the LED source using the provided connecting clamp and electrical tape.
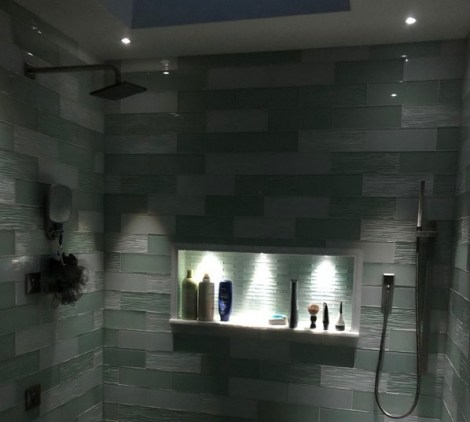
Let There Be Light
The end result is dramatic and cool. Light is controlled by a small remote control that allows for color changes, dimming and power on/off. Color changes work due to a rotating wheel with different color sections so users can have the system constantly cycle colors or stop it anywhere during its rotation to lock it to a preferred color. We generally keep it stopped on the white, but I do like the azure blue as well.
If you are interested, there is video of the color change in action on the post about the tiling of the shower.
Next, I’ll move on to the cabinetry.
