
Alright, the final post about the master bathroom to cover a few things that I haven’t chronicled in the previous (five!) installments. There’s just a few things to discuss, so I’ll try to keep this short.
The Shower
A couple small details that I didn’t mention specifically in the shower post are the design of the bench seat and the body sprays. I’ll start with the bench. You can see from the picture that the front face of the bench angles slightly back at the floor. It’s a minor — but important — detail. By building in this manner, it makes sitting much more comfortable because you don’t hit your heels against the tile when sitting.
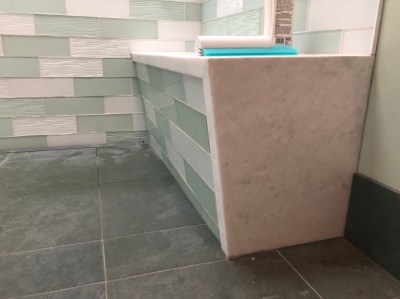
The angle created some complication for the stone fabricators, but it makes a big difference for everyday functionality of the shower bench.
Because of Title 24, (California’s energy code) we couldn’t install a multi-head shower in which more than one shower head operated at the same time. For instance, you can’t have the rain shower and hand shower both running at once. You also can’t have the body sprays spit out more than 2.3 gallons per minute (GPM) combined. In doing some research, I found that Delta made a nifty unit that only flows 1.0 GPM, so I was able to put two of them in the shower. It’s called HydraChoice. But what makes them really cool is how easily they are to swap out for different shower experiences. With a supplied hex key and wrench, you can change the heads in minutes to switch from a gentle shower, to one of Delta’s H20Kinetic heads that offer “invigorating,” “massaging” or “soothing” flow.

Mostly, we prefer the gentle spray that this body spray produces.
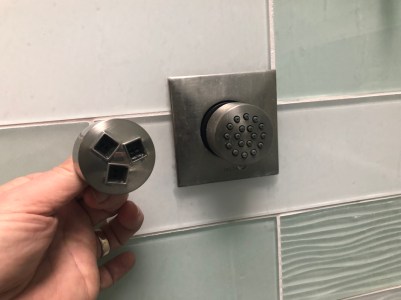
The insert on the left is one of the “kinetic” units that produces an invigorating spray pattern with no additional water use.
Other Details
In the original design of the house, this bathroom used to be part of the back porch. In fact, behind the vanity wall is the brick chimney for the fireplace in the living room. Originally, this was outside, but back when the house was remodeled in the 70s, they converted the porch to the master bedroom closet. I didn’t find a photo of my own, but here’s one of the original closet from the MLS listing.
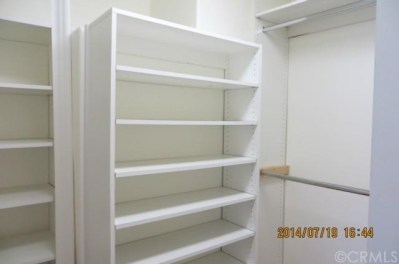
If you look at the top of the shelves in the center of the photo, you can see the “step” in the chimney.
Basically, when they built the chimney, they created a transition point where the wide base (~5-ft) for the fireplace transitions to a narrow (~2-ft) chimney. This left a “shelf” in the brick that would leave a dead space buried behind a new wall. Since storage is at a premium in our house, I thought it would be worth it to recover that space.
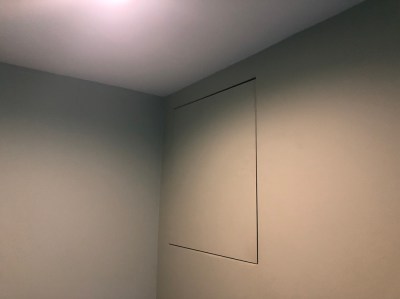
I framed in a small cubby and then made a door from MDF and painted it the wall color so it disappears.
When we wired the house for an exterior surveillance system I thought this would be a great spot to stash the DVR and monitor. Plus, it’s a convenient spot to store a few extra rolls of TP.
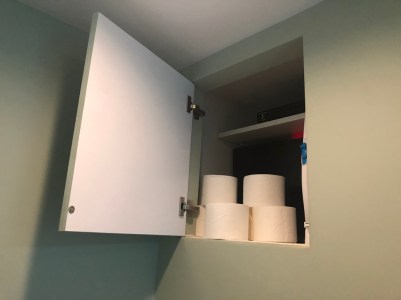
A touch latch pops the door open. otherwise it just disappears into the wall color.
The last detail is the “transom” window. This was a feature that was added to the house before we bought it to help bring some natural light into the space. We opted to keep it, and I recently finished modifying it so it would serve as a little shelf for an air freshener or other bit of decor in the bathroom.

Frosted glass provides privacy, and brings a bit more light into the bathroom.
Final Thoughts
One of the things I’ve started doing in all bathrooms I renovate is adding extra receptacles. In our modern lives, we plug in all kinds of stuff: electric toothbrushes, razors, hair dryers, phone chargers — the list is long. Having extra outlets is a cheap upgrade.

Plenty of spots to plug in all our stuff. I added eight receptacles on the vanity and four more at the make up vanity. The knob on the left controls volume of the speakers in the bath.
Finally, the mirror. I debated having a custom mirror cut and installed by a glass company. And I bought enough materials to create another tile mosaic mirror if we end up going that route someday. But for now, we found a large framed “leaner” mirror online and modified it to hang on the wall. I simply added some reinforcement to the frame to prevent distortion and added a low-profile French cleat to hang it on the wall.
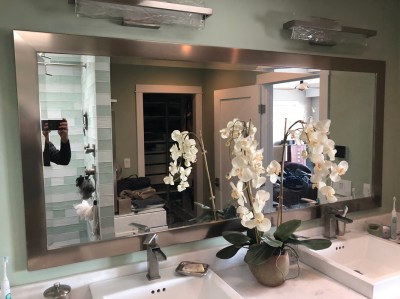
The stainless steel frame matches the fixtures perfectly and the mirror was easy to install with a few easy modifications.
And that’s about it for the master. I hope you enjoyed it.
Next, I’ll move on to the patio project, including a fire pit and outdoor kitchen overlooking Santa Monica bay.
